
Fluid 移植其他主题的标签语法
更新日志
更新主题更换提醒。
更新「时间轴」相关内容。
更新了「选项卡」相关内容,修复了 BUG 解决部分中 mathjax相关的修复方式无法生效的问题。
规范了更新日志格式。
更新了「选项卡」相关内容,将避坑提醒转移到 BUG 解决部分。
更新了「选项卡」相关内容,新增避坑提醒。新增「链接卡片」相关内容。
发布文章。
选项卡
Tabs 标签是从 Butterfly 主题上扒下来的,也参考了 hexo-tag-common 插件。
先看效果演示。
效果演示
{% tabs name, [index] %}
<!-- tab [Tab caption] [@icon] -->
Any content (support inline tags too).
<!-- endtab -->
{% endtabs %}name:- 选项卡块标签的名称,不带逗号。
[index]:- 活动选项卡的索引号。
- 如果未指定,将选择第一个标签。
- 如果
index为-1,则不会选择任何选项卡。 - 可选参数。
[Tab caption]:- 当前选项卡的标题。
- 如果未指定标题,则带有制表符索引后缀的唯一名称将用作制表符的标题。
- 如果未指定标题,但指定了图标,则标题将为空。
- 可选参数。
[@icon]:- Iconfont 图标名称(全名,如:
iconfont icon-font) - 可以指定带空格或不带空格;
- 例如
Tab caption @icon和Tab caption@icon。 - 可选参数。
This is Tab 1.
This is Tab 2.
This is Tab 3.
This is Tab 1.
This is Tab 2.
This is Tab 3.
This is Tab 1.
This is Tab 2.
This is Tab 3.
tab名字为第一个Tab
只有图标 没有Tab名字
名字+icon
{% tabs test1 %}
<!-- tab -->
**This is Tab 1.**
<!-- endtab -->

<!-- tab -->
**This is Tab 2.**
<!-- endtab -->

<!-- tab -->
**This is Tab 3.**
<!-- endtab -->
{% endtabs %}{% tabs test2, 3 %}
<!-- tab -->
**This is Tab 1.**
<!-- endtab -->
<!-- tab -->
**This is Tab 2.**
<!-- endtab -->
<!-- tab -->
**This is Tab 3.**
<!-- endtab -->
{% endtabs %}{% tabs test3, -1 %}
<!-- tab -->
**This is Tab 1.**
<!-- endtab -->
<!-- tab -->
**This is Tab 2.**
<!-- endtab -->
<!-- tab -->
**This is Tab 3.**
<!-- endtab -->
{% endtabs %}{% tabs test4 %}
<!-- tab 第一个Tab -->
**tab名字为第一个Tab**
<!-- endtab -->
<!-- tab @iconfont icon-github-fill -->
**只有图标 没有Tab名字**
<!-- endtab -->
<!-- tab 随机@iconfont icon-random -->
**名字+icon**
<!-- endtab -->
{% endtabs %}是的,与 Next 主题和 Butterfly 主题的 Tabs 语法一致,因为就是移植过来的。
接下来看配置方法。
配置
增加 tags
在 scripts\tags 目录下新建 tab.js 文件,添加如下内容:
'use strict'

function getUuid() {
    return Math.random().toString(36).substring(2, 8) + Date.now().toString(36);
}

const postTabs = (args, content) => {
    const tabBlock = /<!--\s*tab (.*?)\s*-->\n([\w\W\s\S]*?)<!--\s*endtab\s*-->/g
    args = args.join(' ').split(',')
    const tabName = args[0] || 'tab'
    const tabActive = Number(args[1]) || 0
    const matches = []
    let match
    let tabId = 0
    let tabNav = ''
    let tabContent = ''
    let noDefault = true

    while ((match = tabBlock.exec(content)) !== null) {
        matches.push(match[1], match[2])
    }

    const tabsId = "t" + getUuid();

    for (let i = 0; i < matches.length; i += 2) {
        const tabParameters = matches[i].split('@')
        let postContent = matches[i + 1]
        let tabCaption = tabParameters[0] || ''
        let tabIcon = tabParameters[1] || ''

        postContent = hexo.render.renderSync({ text: postContent, engine: 'markdown' }).trim()

        tabId += 1

        if (tabCaption.length === 0 && tabIcon.length === 0) tabCaption = tabName + ' ' + tabId

        const icon = tabIcon.trim()
        tabIcon.length > 0 && (tabIcon = `<i class="${icon}"></i>`)

        // Generate unique IDs for tabs and content
        const contentIdAttr = `${tabsId}-${tabId}`

        let isActive = ''
        if ((tabActive > 0 && tabActive === tabId) || (tabActive === 0 && tabId === 1)) {
            isActive = ' active'
            noDefault = false
        }

        tabNav += `<button type="button" class="tab${isActive}" data-target="${contentIdAttr}">${tabIcon + tabCaption.trim()}</button>`
        tabContent += `<div class="tab-item-content${isActive}" id="${contentIdAttr}">${postContent}</div>`
    }

    const toTop = '<div class="tab-to-top"><button type="button" aria-label="scroll to top"><i class="iconfont icon-arrow-up-bold"></i></button></div>'

    tabNav = `<div class="nav-tabs${noDefault ? ' no-default' : ''}">${tabNav}</div>`
    tabContent = `<div class="tab-contents">${tabContent}</div>`

    return `<div class="tabs" id=${tabsId}>${tabNav + tabContent + toTop}</div>`
}

hexo.extend.tag.register('tabs', postTabs, { ends: true })
hexo.extend.tag.register('subtabs', postTabs, { ends: true })
hexo.extend.tag.register('subsubtabs', postTabs, { ends: true })hexo cl && hexo g && hexo s 三连,就已经可以解析并生成对应的 HTML 代码了。增加样式
在 source/custom/css/_tags 中创建 tab.styl 文件,添加如下内容:
@css {
    :root {
        --tab-border-color: rgba(100, 100, 100, 0.25);
        --tab-botton-bg: rgba(100, 100, 100, 0.1);
        --tab-botton-color: var(--text-color);
        --tab-button-hover-bg: rgba(170, 170, 170, 0.15);
        --tab-hover-border-color: rgba(240, 140, 140, 0.4);
        --tab-active-border-color: rgba(240, 30, 30, 0.9);
        --tab-button-active-bg: rgba(210, 210, 210, 0.1.5);
        --tab-to-top-color: var(--text-color);
        --tab-to-top-hover-color: rgba(203, 60, 60, 1);
    }
}

addBorderRadius(x = 6)
  border-radius: unit(x, 'px')

.tabs
  position: relative
  margin: 0 0 20px
  border: none
  addBorderRadius()
  background: rgba(200, 200, 200, 0.1)
  overflow: hidden

  > .nav-tabs
    display: flex
    flex-wrap: wrap
    margin: 0
    padding: 0
    background: var(--tab-botton-bg)

    > .tab
      flex-grow: 1
      padding: 8px 18px
      border-top: none
      border-bottom: 2px solid var(--tab-border-color)
      border-right: 0.75px solid var(--tab-border-color)
      border-left: 0.75px solid var(--tab-border-color)
      background: var(--tab-botton-bg)
      color: var(--tab-botton-color)
      line-height: 2
      transition: all .4s

      i
        width: 1.5em

      &.active
        border-bottom: 2px solid var(--tab-active-border-color)
        background: var(--tab-button-active-bg)
        cursor: default

      &:not(.active)
        &:hover
          border-bottom: 2px solid var(--tab-hover-border-color)
          background: var(--tab-button-hover-bg)

    &.no-default
      & ~ .tab-to-top
        display: none

  > .tab-contents
    .tab-item-content
      position: relative
      display: none
      padding: 36px 24px 10px

      @media screen and (max-width: 768px)
        padding: 24px 14px


      &.active
        display: block
        animation: tabshow .5s

      > :last-child
        margin-bottom: 0

  > .tab-to-top
    padding: 0 16px 10px 0
    width: 100%
    text-align: right

    button
      addBorderRadius()
      color: var(--tab-to-top-color)
      border: 1px  solid var(--tab-border-color)

      &:hover
        color: var(--tab-to-top-hover-color)

@keyframes tabshow
  0%
    transform: translateY(15px)

  100%
    transform: translateY(0)
然后在 source/custom/css 中创建 tags.styl,内容为 @import "_tags/*";,方便后续添加更多标签。最后在 _config.fluid.yml 中修改 custom_css 配置项:
custom_css:
- custom/css/tagshexo cl && hexo g && hexo s 三连,就能看到选项卡已经正确渲染了。增加逻辑跳转
在 source/custom/js 中创建 tags.js 文件,添加如下内容:
"use strict";

const getEleTop = (ele) => {
    let actualTop = ele.offsetTop
    let current = ele.offsetParent
    while (current !== null) {
        actualTop += current.offsetTop
        current = current.offsetParent
    }
    return actualTop
}

/* <---- Tabs Begin ----> */
// 初始化选项卡
const initializeTabs = () => {
    document.querySelectorAll('.tabs').forEach(tabs => {
        addTabClickEventListeners(tabs);
    });
}

// 为选项卡添加点击事件监听器
const addTabClickEventListeners = (tabs) => {
    tabs.querySelectorAll('.nav-tabs .tab').forEach(tab => {
        tab.addEventListener('click', (event) => handleTabClick(event));
    });
}

// 初始化回到顶部按钮
const initializeScrollToTopButtons = () => {
    document.querySelectorAll('.tabs .tab-to-top button').forEach(button => {
        button.addEventListener('click', (event) => handleScrollToTop(event));
    });
}

const handleTabClick = (event) => {
    event.preventDefault();
    const clickedTab = event.currentTarget;

    // 找到当前选项卡组
    const targetId = clickedTab.dataset.target;
    const tabsContainerId = targetId.split('-')[0];

    const tabsContainer = document.querySelector(`#${tabsContainerId}`);
    if (!tabsContainer) return;

    // 处理 nav-tabs 部分
    tabsContainer.querySelectorAll('.nav-tabs .tab').forEach(tab => {
        if (tab.dataset.target.split('-')[0] === tabsContainerId) {
            tab.classList.toggle('active', tab === clickedTab);
        }
    });

    // 处理 tab-contents 部分
    if (targetId) {
        const contentToShow = tabsContainer.querySelector(`#${targetId}`);
        if (contentToShow) {
            tabsContainer.querySelectorAll('.tab-contents .tab-item-content').forEach(content => {
                if (content.id.split('-')[0] === tabsContainerId) {
                    content.classList.toggle('active', content === contentToShow);
                }
            });
        }
    }
}

const handleScrollToTop = (event) => {
    event.stopPropagation(); // 阻止事件冒泡

    // 找到当前按钮所在的选项卡组
    const tabGroup = event.currentTarget.closest('.tabs');
    window.scrollTo({ top: getEleTop(tabGroup) - 70, behavior: 'smooth' });
}

const tabsFn = () => {
    initializeTabs();
    initializeScrollToTopButtons();
}
/* <---- Tabs End ----> */

function tagsFn() {
    tabsFn();
}

document.addEventListener('DOMContentLoaded', () => {
    tagsFn();
});_config.fluid.yml 中修改 custom_js 配置项:custom_js:
- custom/js/tags.jshexo cl && hexo g && hexo s 三连,即可正常渲染并使用选项卡了。BUG 解决
移植的 Tabs 选项卡标签插件可能会与 Fluid 主题的某些配置冲突,以下是解决方案:
数学公式引擎为KaTeX
KaTeX 使用的 hexo-markdown-it 渲染引擎会与 tocbot 冲突,导致右侧的目录栏的一级目录无法正确跳转,请参考我的另一篇博文解决该 bug。
数学公式引擎为mathjax
mathjax 使用的 hexo-renderer-pandoc 渲染引擎会与主题自带 note 标签冲突,导致内部嵌套的 note 标签会出错: 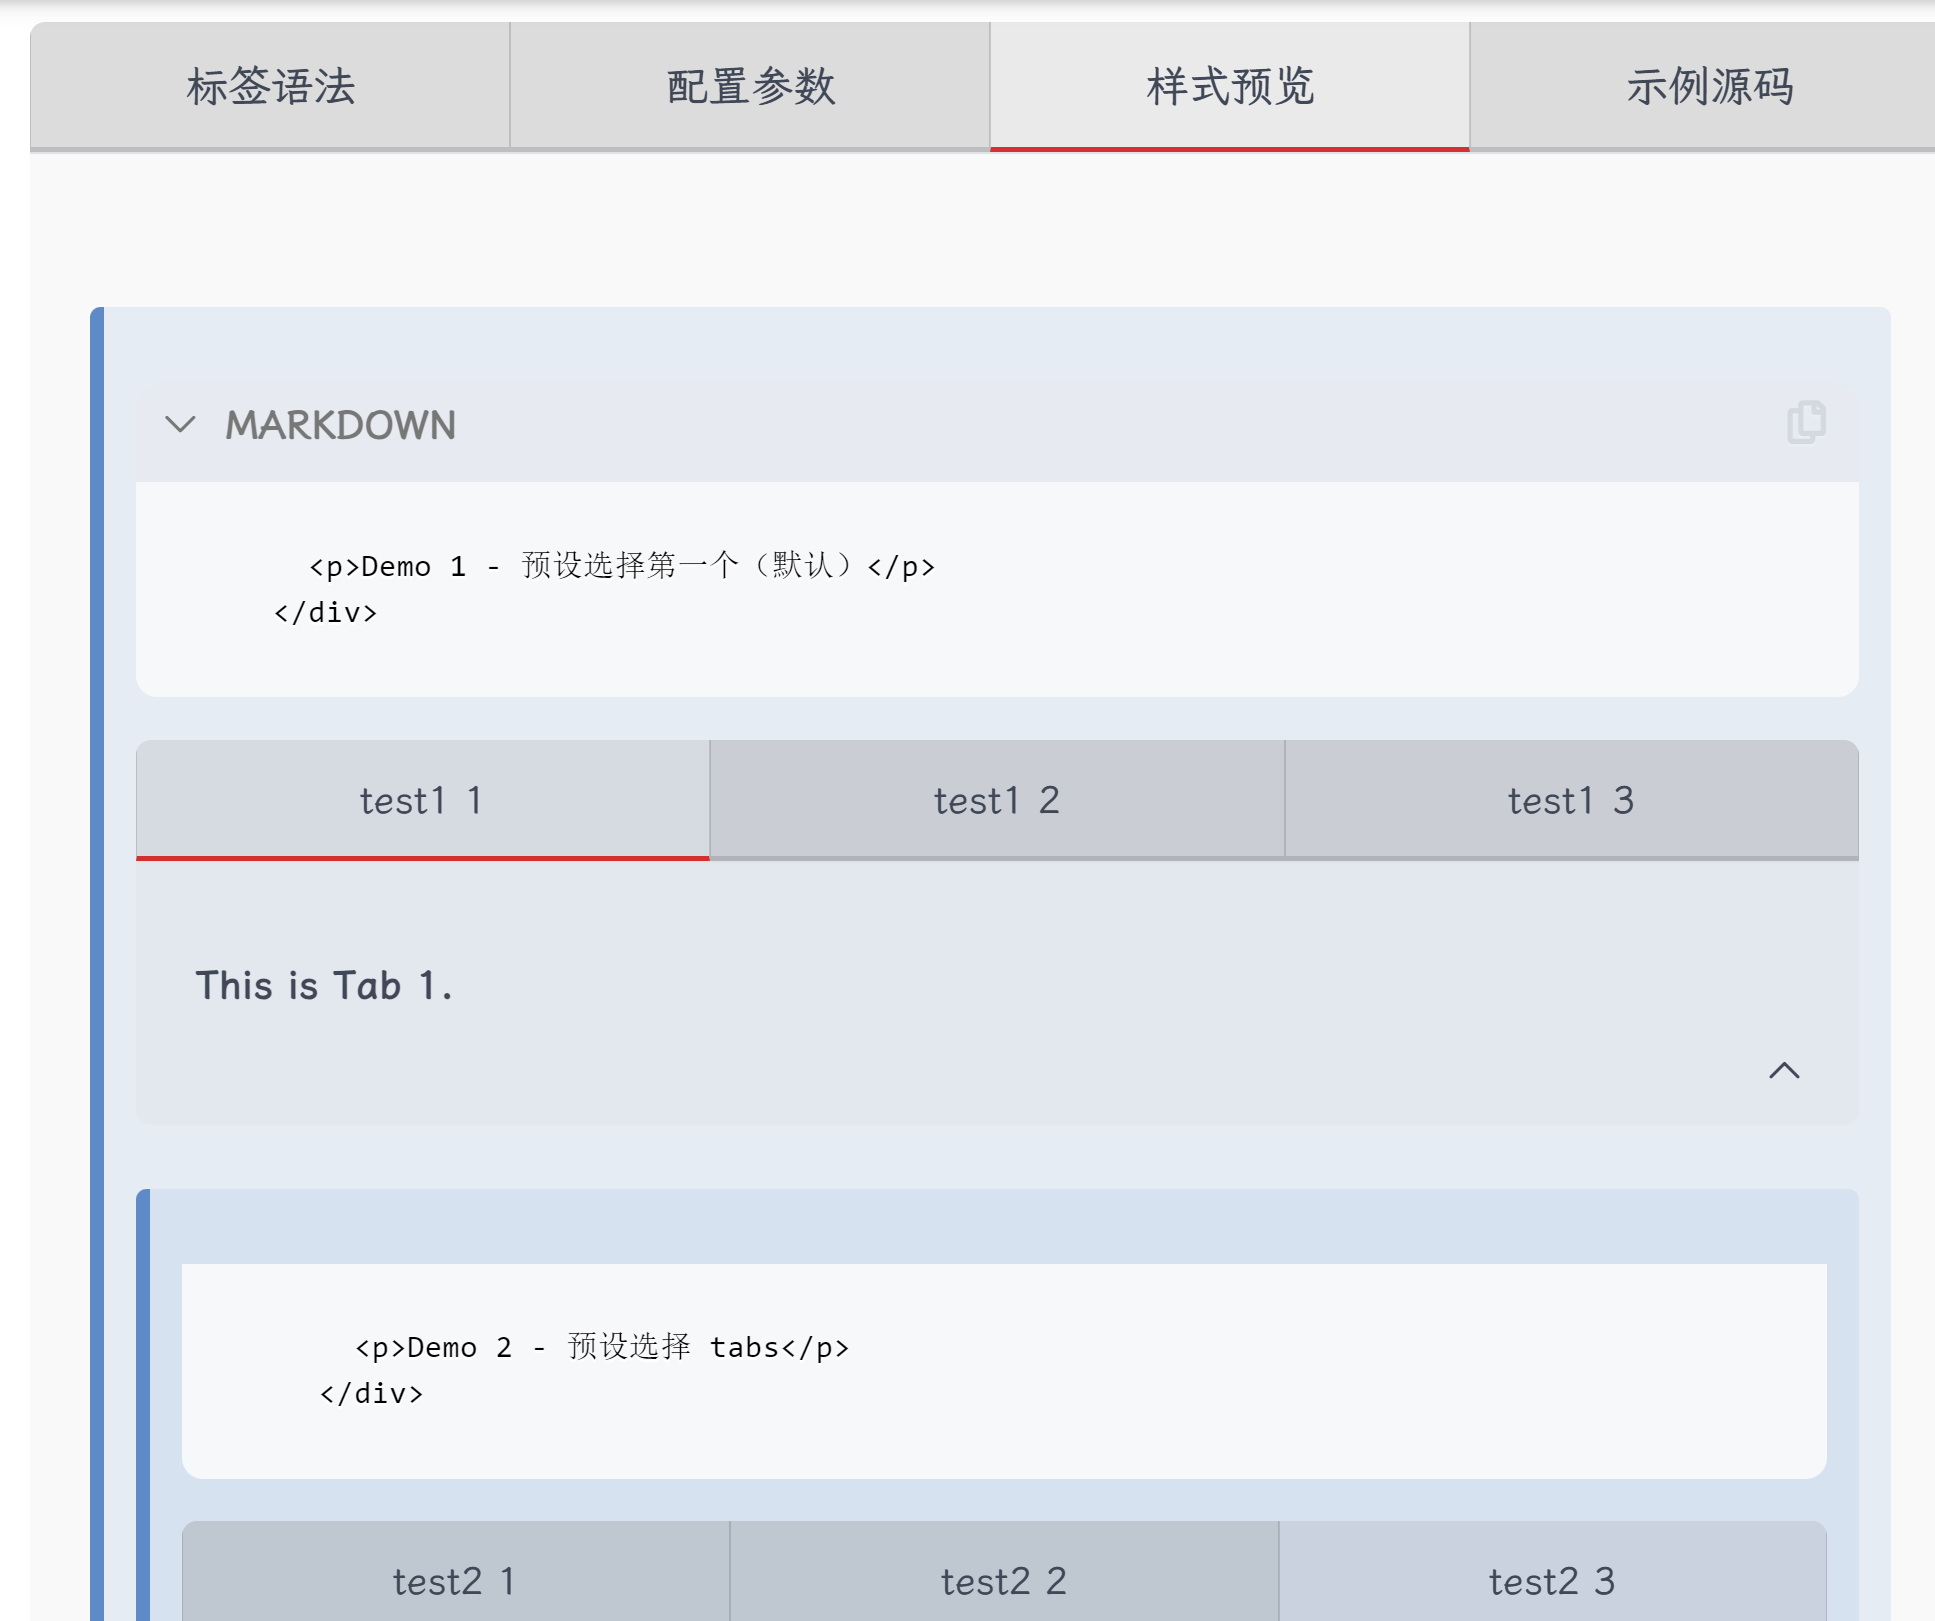
解决方案:虽然很不情愿,也有违本篇博客描述的「非侵入式」,但由于在博客的 scripts 目录下修改,会因为加载时间问题无法覆盖主题的 note tag,所以这个 bug 必须修改主题源文件。把 node_modules/hexo-theme-fluid/scripts/tags/note.js 返回语句的换行去掉即可:
'use strict'

const note = (args, content) => {
    if (!args || !args[0] || args[0].toLowerCase() === "default") {
        args = [hexo.theme.config.post.updated.note_class || "info"];
    }
    // 删掉换行
    // return `<div class="note note-${args.join(' ')}">
    //         ${hexo.render.renderSync({ text: content, engine: 'markdown' }).split('\n').join('')}
    //       </div>`;
    return `<div class="note note-${args.join(' ')}">${hexo.render.renderSync({ text: content, engine: 'markdown' }).split('\n').join('')}</div>`;
};

hexo.extend.tag.unregister('note') // 重新注册 tag
hexo.extend.tag.register('note', note, { ends: true })
此外,按照上述方法修复 BUG 后,还会有三重嵌套的 Tab 无法使用的 BUG,不过正常情况下应该用不上三重嵌套就没管。
链接卡片
这个标签移植自 hexo-butterfly-tag-plugins-plus 插件,基本属于复制过来就完事。
效果演示
{% linkcard 标题, 链接, 图片链接(可选) %}{% linkcard HPCesia 的摆烂小屋, https://hpcesia.github.io/, /img/pwa/favicon.png %}配置
在 scripts\tags 目录下新建 linkcard.js 文件,添加如下内容:
'use strict';

// {% linkcard title, url %}
// {% linkcard title, url, img %}
hexo.extend.tag.register('linkcard', function (args) {
    var configtemp = hexo.config.tag_plugins || hexo.theme.config.tag_plugins
    args = args.join(' ').split(',')
    let text = ''
    let url = ''
    let img = ''
    if (args.length < 2) {
        return
    } else if (args.length == 2) {
        text = args[0].trim()
        url = args[1].trim()
    } else if (args.length == 3) {
        text = args[0].trim()
        url = args[1].trim()
        img = args[2].trim()
    }
    let result = '';
    result += '<div class="tag linkcard"><a class="link-card" title="' + text + '" href="' + url + '">';
    result += '<div class="left">';
    result += '<img src="' + (img || configtemp.link.placeholder) + '"/>';
    result += '</div>';
    result += '<div class="right"><p class="text">' + text + '</p><p class="url">' + url + '</p></div>';
    result += '</a></div>';

    return result;
});
在 source/custom/css/_tags 中创建 linkcard.styl 文件,添加如下内容:
.tag.linkcard
  text-align center

a
  &.link-card
    margin 0.25rem auto
    background #f6f6f6
    display inline-flex
    align-items center
    cursor pointer
    text-align center
    min-width 200px
    max-width 361px
    color #444
    border-radius 12px
    text-decoration none
    &:hover
      box-shadow 0 4px 8px 0 rgba(0, 0, 0, 0.1)
    div
      &.left
        width 48px
        height 48px
        margin 12px
        overflow hidden
        flex-shrink 0
        position relative
        i
          font-size 32px
          line-height 48px
          margin-left 4px
        img
          display block
          position absolute
          border-radius 2px
          top 50%
          left 50%
          transform translate(-50%, -50%)
      &.right
        overflow hidden
        margin-right 12px
    p
      margin 0
      &.text
        font-weight bold
      &.url
        flex-shrink 0
        color rgba(68, 68, 68, 0.65)
        font-size 13px

@media screen and (max-width: 425px)
  a
    &.link-card
      max-width 100%

@media screen and (max-width: 375px)
  a
    &.link-card
      width 100%

a.link-card div.left,
a.link-card div.right
  pointer-events none

[data-user-color-scheme="dark"]
  a
    &.link-card
      filter brightness(0.7)
      img
        filter brightness(1)
使用 hexo cl && hexo g && hexo s 三连,即可正常渲染并使用链接卡片了。
时间轴
这个标签移植自 hexo-butterfly-tag-plugins-plus 插件的 1.0.15 版本,基本属于复制过来就完事。
效果演示
{% timeline [时间轴标题(可选)] %}
{% timenode [时间节点标题(可选)] %}
内容
{% endtimenode %}
{% timenode [时间节点标题(可选)] %}
内容
{% endtimenode %}
{% endtimeline %}更新时间线标签。更新了选项卡相关内容,修复了 BUG 解决部分中 mathjax相关的修复方式无法生效的问题。
更新了选项卡相关内容,将避坑提醒转移到 BUG 解决部分。
更新了选项卡相关内容,新增避坑提醒。新增链接卡片相关内容。
发布文章。
{% timeline 时间轴样式预览 %}
{% timenode 2024-09-03 %}
更新时间线标签。更新了选项卡相关内容,修复了 BUG 解决部分中 mathjax 相关的修复方式无法生效的问题。
{% endtimenode %}
{% timenode 2024-08-30 %}
更新了选项卡相关内容,将避坑提醒转移到 BUG 解决部分。
{% endtimenode %}
{% timenode 2024-08-28 %}
更新了选项卡相关内容,新增避坑提醒。新增链接卡片相关内容。
{% endtimenode %}
{% timenode 2024-08-27 %}
发布文章。
{% endtimenode %}
{% endtimeline %}
配置
在 scripts\tags 目录下新建 timeline.js 文件,添加如下内容:
'use strict';

function postTimeline(args, content) {
  if (args.length > 0) {
    return `<div class="timeline"><p class='p h3'>${args}</p>${content}</div>`;
  } else {
    return `<div class="timeline">${content}</div>`;
  }
}

function postTimenode(args, content) {
  args = args.join(' ').split(',')
  var time = args[0]
  return `<div class="timenode"><div class="meta"><p>${hexo.render.renderSync({text: time, engine: 'markdown'})}</p></div><div class="body">${hexo.render.renderSync({text: content, engine: 'markdown'}).split('\n').join('')}</div></div>`;
}


// {% timeline %}
// ... timenode ...
// {% endtimeline %}
hexo.extend.tag.register('timeline', postTimeline, {ends: true});

// {% timenode time %}
// what happened
// {% endtimenode %}
hexo.extend.tag.register('timenode', postTimenode, {ends: true});
在 source/custom/css/_tags 中创建 timeline.styl 文件,添加如下内容:
div
  &.timenode
    position relative
    &:before
      top 0
      height 6px
    &:after
      top 26px
      height calc(100% - 26px)
    &:last-child
      &:after
        height calc(100% - 26px - 16px)
        border-bottom-left-radius 2px
        border-bottom-right-radius 2px
    .meta
      position relative
      color var(--text-color)
      font-size 0.75rem
      line-height 32px
      height 32px
      &:before
        background rgba(68, 215, 182, 0.5)
        width 16px
        height 16px
        border-radius 8px
      &:after
        background #44d7b6
        margin-left 2px
        margin-top 2px
        width 12px
        height 12px
        border-radius 6px
        transform scale(0.5)
      p
        font-weight bold !important
        margin 0 0 0 24px !important
    .body
      margin 4px 0 10px 24px
      padding 10px
      border-radius 12px
      background rgba(127, 127, 127, 0.1)
      display inline-block
      p
        &:first-child
          margin-top 0 !important
        &:last-child
          margin-bottom 0 !important
      .highlight
        background #fff7ea
        filter grayscale(0%)
        figcaption
          background #ffeed2
        .gutter
          background #ffedd0
    &:hover
      .meta
        &:before
          background rgba(68, 215, 182, 0.5)
        &:after
          background #96cec2
          transform scale(1)

div.timenode:before,
div.timenode:after
  content ""
  z-index 1
  position absolute
  background rgba(68, 215, 182, 0.5)
  width 2px
  left 7px

div.timenode .meta,
div.timenode .body
  max-width calc(100% - 24px)

div.timenode .meta:before,
div.timenode .meta:after
  content ""
  position absolute
  top 8px
  z-index 2

[data-theme="dark"]
  div
    &.timenode
      .body
        background #2c2c2c
      &:hover
        .meta
          color #ccd0d7
      .meta
        color rgba(255, 255, 255, 0.6)
使用 hexo cl && hexo g && hexo s 三连,即可正常渲染并使用时间轴了。